Tag Archives: doll making

My dream- the main idea behind my doll project

This is a quick post to give you an idea what my plans are with this doll project.
At the moment I am doing a ball jointed doll out of Cernit just for myself.

My aim is to practise sculpting and to learn how to make quality dolls and to maybe produce some dolls in the future. This is a dream and I am writing this down to see if I will achieve this in future. Then I can come back to this post and remember how things were at the beginning of my project.

It would be great to make limited edition dolls,maybe with a one of a kind costuming and unique painting. The dolls will all have a certain theme,which I already have in mind, but I will share this with you as soon as the time is right for it.

Until then, enjoy the journey and watch my first doll made of Cernit come to life!


-Read my post “What is a bjd” to learn more about ball jointed dolls and find out what information helps me during the doll making process .-


Tagged , , , , , , ,

Making my own ball jointed doll-The lower torso Part 1

Finally brave enough to bake a piece of Cernit

Honestly, the last days I was a bit afraid to bake my clay. Baking polymer clay means it’s definite and you cannot knead and sculpt with it anymore, because after the baking/curing process, the Cernit is strong and has its definite shape.

Nevertheless, after some days of doing nothing, I decided that today would be the day to start to bake part of my doll. And I must say that I am quite satisfied with the results and happy that I took that step.

basic doll body

Okay, so what I did was to start with the lower torso,without the chest and shoulders. I baked the clay at 130 degrees for about 15 minutes and the Cernit color turned to a nice sun tan color.

Wow, you cannot imagine how long it took me to get the aluminium foil out of the body. It took me nearly 2 hours!!!!!!! Simply because I was not smart enough before to roll the foil together in a loose form. Instead, what I did was to do a quite strong core of alufoil, and this was a mistake! It was so hard to get the pieces out, because they where really attached to each other. Pheew, as you can see I succeeded at last. And besides that, the 2 hours were okay because I had the Tv on while pulling the  foil out.

doll torsoThis is the basic torso. I will still add Cernit here and there,scratch parts away and simply see what still has to be changed to get a correct doll torso.

Oh btw, what you see next to the torso is a forceps. I used this and other tools that I had on hand.

The backside from the torso. I think the aluminium foil beside it looks kinda nice, it makes a nice picture don’t you think?

Oh btw, what you see next to the torso is a forceps. I used this and other tools that I had on hand.
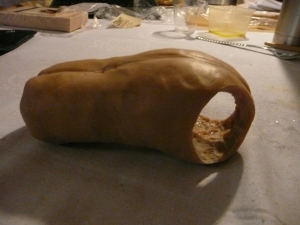
 

I just had to take this picture because I was so happy when the doll torso was finally aluminium-free.

This project is really fun! The more I do on the doll, the more fun I have because I can see the change =)

Tagged , , , , , , ,

Making my own ball jointed doll-The blueprint

Yippiee I am finally structured and have decided to make a sketch for my ball jointed doll

My aim is to make my own ball jointed doll. After experiencing some ups and downs during my doll making project that I started in November, I have now decided to start again and  post my new journey.

My aim is to make my own ball jointed doll. After experiencing some ups and downs during my doll making project that I started in November, I have now decided to start again and  post my new journey.

The ball jointed doll I am planning to make should be a teenager, that’s why I now made a  rough sketch of the doll.

The main idea behind the making of a blueprint, a sketch,was to determine the height of the doll and to get  the proportions right.

There are some essential rules when it comes to the human proportions. Artists measure the body in head lengths. The average european body would be 7,5 or 8 heads high. A 14-year-old would be about 7 heads high.

Haha my sketch is not that beautiful, I admit, but well, it was more an attempt to get the proportions right, rather than creating a perfect sketch =)

In order to be sure about the head lengths, I checked Hildegard Gunzel’s book “Creating Original Porcelain Dolls” . Here are some examples from Günzel’s doll book :

creating your own porcelain dollgunzel book creating original porcelain dolls

Well, this was my first step at making myown ball jointed doll. I made a blueprint of my future bjd and took the first (fresh )step of my doll making process. This time I will stay focussed!

Oh and by the way, just for those of you who wonder why I sometimes call the lady ‘Günzel’ and at times ‘Gunzel’: well originally  her name is  Günzel, as she is a german doll artists, but I sometimes write Gunzel, because that’s how she is referred to in the english speaking world.

Tagged , , , ,

Joining the joint

I joined a doll makers forum of Den of Angels, it’s called TheJoint

The other day I spoke about certain aspects that are useful when it comes to creating a doll. Today I remembered one more thing that inspires me during the doll process: a special forum! Okay, even though I am not continuing with my doll at the moment (yeah yeah very bad I know) I am busy with her in my mind =)

Maybe thinking of the doll making process IS part of the process haha. Well the forum I am talking of is THE JOINT at Den of Angels. Wow it’s a great internet platform, where a lot of artists come together.

Tagged , , , ,

Will paperclay and i ever be friends? The beginning of sculpting a bjd

Doll making. That’s my new project i will be focussing on from now on! And yes, i am quite excited. After doing a lot of research and deciding which clay to work with, i ordered some materials and  finally got started. The thing is, i am a quite impatient person and therefore had a lot of material changes before i found the right material to work with. I have decided to go for an oil based clay for my prototype doll. Why? Because it’s a soft clay that doesn’t harden, which means it can always be reused for my master dolls (incase this becomes a hobby I’ll do for a looong time).

Unfortunately, i went for an extremely cheap oil based clay and had to learn that sometimes  its better to invest more if you want a real quality product. The clay is supposed to be for children but it is extremely hard and doesn’t soften when you use your hands to form small soft balls. So what did i do? Because i really really wanted to get started and couldn’t wait any longer, i went to buy new material and hoped to find a better oil clay. But the only thing i could find was PAPERCLAY. I thought well, paperclay is one of  THE favorite material of bjd makers, and it’s really cheap-so i bought 4 small packages=2 kilos. But as you might have guessed already, paperclay and i did not get friends and i think we never will.

My personal opinion about paperclay: i have made experience with DAS paperclay and  HEMA-boetserklei(dutch product) so far. Both of them had a strong chemical smell (people with migraine should beware) and needed a lot of water to become soft and less resistant.

Apart from these strong contra aspects, i guess i can work more relaxed with a material that doesn’t air dry within hours.

But luckily, i now, after putting the paperclay aside- bought a good oil based clay and it seems like we could become good friends =)

Tagged , , , , ,